ね、眠いです。。。眠いですけどこれは記憶が新鮮なうちに記録しておかないと、また絶対はまるので、がんばって残します。
ionic で本格的なアプリケーションを作っているとぶつかる問題に プッシュ通知 があります。 プッシュ通知 自体は難しくないんですけど、Appleの証明書やProvision Profileあたりが結構ややこしくて迷子になりやすいです。(現に私も迷子になりました。。。)参考サイトはたくさんあるのですが、 ionic に絞ったものがなかなか見つからず、見本が無かったので苦戦しました。なので今後の自分の為にもキャプチャと一緒にやり方を載せます! 1から9 と言っているのは、 プッシュ通知 の実装にはあまり着目しません。 GitHub 上のサンプルコードをほとんどそのまま使います。苦戦するのは結局Appleの証明書、Provision Profile周りなので、そこの内容を重点的に抑えます。
サンプルプロジェクトの作成
今回のデモ用にサンプルプロジェクトを作って起動確認しましょう。
|
1 2 3 4 5 6 7 8 9 10 11 12 13 14 15 |
# プロジェクト作成 ionic start push-notification-starter ... # ionic.ioではなく、cordovaのプッシュ通知を実装するのでここは「n」 Create an ionic.io account to send Push Notifications and use the Ionic View app? (Y/n): n # プロジェクト作成完了したらそのフォルダへ移動 cd push-notification-starter # ブラウザでとりあえずアプリの起動を確認 ionic serve |
Apple Dev Centerでのあれこれ
認証局証明書要求用のファイル作成
キーチェーンアクセス を起動して、 証明書アシスタント から 認証局に証明書を要求 します。

証明書情報を入力します。
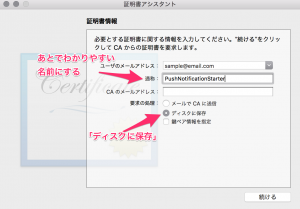
- ユーザのメールアドレス:なんでもOKみたいですけど、開発者登録しているアドレスにする人が多いみたいです
- 通称:あとから見てもわかるような名前にしておきましょう!
- 要求の処理:ディスクに保存しておきます
完了すると、キーチェーンアクセスの 鍵 に先ほど 通称 で書いた名前の 公開鍵 と 秘密鍵 が増えているのが確認できると思います。
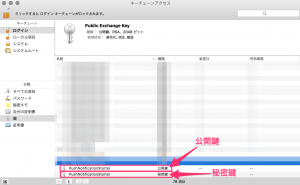
それでは、 秘密鍵 をエクスポートしておきましょう!

秘密鍵 はとーっても大事なので、保護するためにパスワードをかけておきます。この記事で作るアプリはサンプルなのでパスワードは pushnotificationstarter としています。本来はちゃんとわかりにくい、秘密のパスワードにしておいてくださいね。

App ID生成
それでは Apple Developer Member Center でApp IDを生成します。
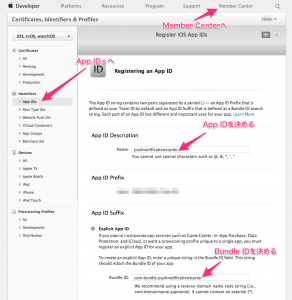
執筆時点での Member Center は↑のような画面です。
- App ID Description:任意のApp ID決めます
- App ID Suffix | Explicit App ID:任意のBundle IDを決めます
下に行って Push Notification のチェックも忘れずに!
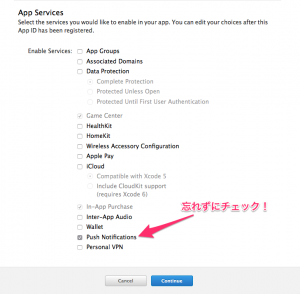
そして登録します!
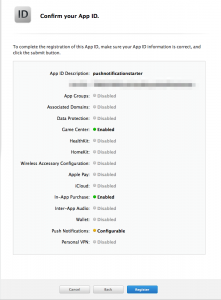
↓のようにApp IDが生成されたのが確認できると思います。
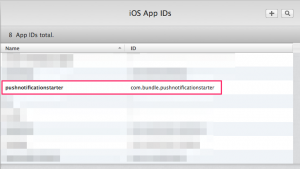
ここをクリックするの↓のような画面が出てきます。プッシュ通知は有効だけど、まだ設定が必要(Configurable)な状態であることがわかります。
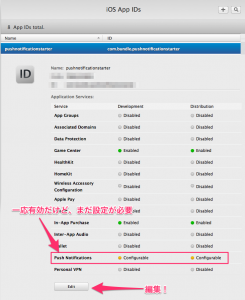
Edit をクリックして編集しましょう!
証明書の作成
今回は開発用に証明書を作りたいだけ(Development SSL Certificate)なので↓の Create Certificate をクリック!
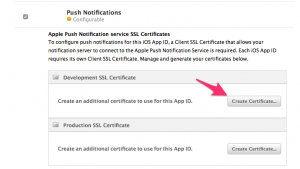
↓のように、「証明書の発行には証明書要求用のファイルが必要だよ!」って書かれてます。これが先ほどの「認証局証明書要求用のファイル作成」で作ったファイルのことです。
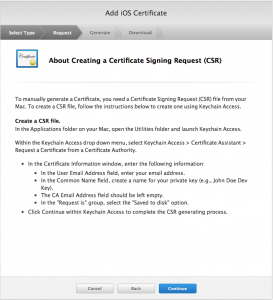
さっそくファイルを選びましょう。
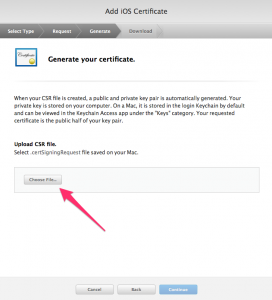

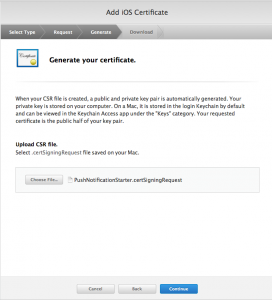
↑これで証明書が作れる! Continue で次へ進みましょう!
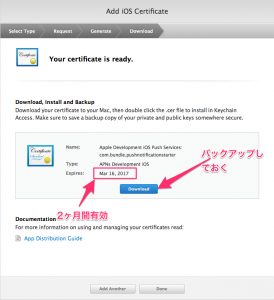
2ヶ月間有効な証明書が用意されたので、ダウンロードしてバックアップをちゃんとしておきましょう。
Provisioning Profileの作成
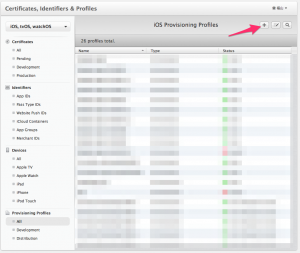
Provisioning Profile メニューから「+」で新しい Provisioning Profile を作ります。
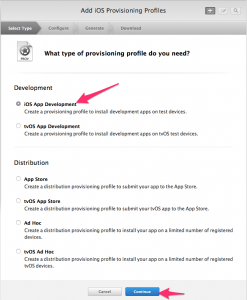
- Development:iOS App Development
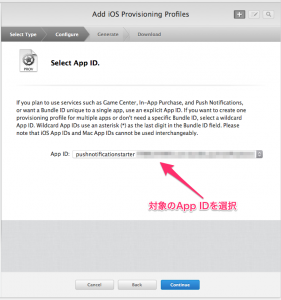
先ほど作ったAppIDを選択します
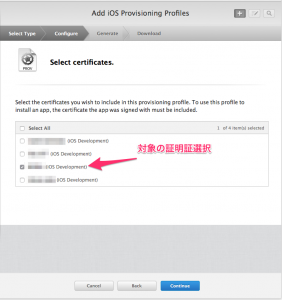
対象となる証明書を選びます。
対象となるデバイスを選びます。
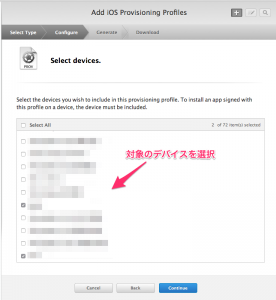
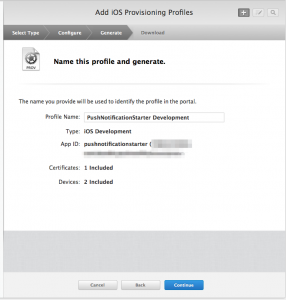
Provisioning Profileの名前を決めます
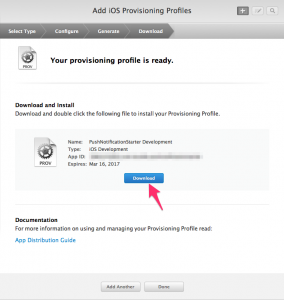
完成したらダウンロードして ダブルクリック してXCODEに盛り込みましょう!
APNS繋がるかテスト
PEMファイルの作成
飽々するような手続きはいったんここで終了!それではAPNS(Appleのプッシュ通知用サーバー)に繋がるか試してみる為に、 PEMファイル を生成しましょう!(PHPのダミープログラムを使ってプッシュ通知を行うので、↓のような PEMファイル を作ります。
|
1 2 3 4 5 6 7 8 9 10 11 12 13 14 15 16 17 18 19 20 |
# 諸々Dev Centerからダウンロードしたファイル群を置いているフォルダに移動 cd ~/Desktop/PushNotificationStarter # .cerファイルを.pemファイルに変換 openssl x509 -in aps_development.cer -inform der -out PushNotificationStarterCert.pem # .p12ファイルを.pemファイルに変換 openssl pkcs12 -nocerts -out PushNotificationStarterKey.pem -in PushNotificationStarterKey.p12 # 秘密鍵保護用パスワード入力。今回なら「pushnotificationstarter」 Enter Import Password: MAC verified OK # パスワードを決める Enter PEM pass phrase: Verifying - Enter PEM pass phrase: # PHPで使えるpemファイルにするために合体 cat PushNotificationStarterCert.pem PushNotificationStarterKey.pem > ck.pem |
telnetでsandboxに繋がるか確認
|
1 2 3 4 5 |
telnet gateway.sandbox.push.apple.com 2195 Trying 17.172.232.46... Connected to gateway.sandbox.push-apple.com.akadns.net. Escape character is '^]'. |
↑みたいな表示になればAppleのAPNSに通信できていることは確認。これがエラーになる場合は Firewall とかの設定を見直し!では、次はちゃんと証明書と秘密鍵つきで通信しましょう!
|
1 2 3 4 5 6 7 8 9 10 11 |
openssl s_client -connect gateway.sandbox.push.apple.com:2195 -cert PushNotificationStarterCert.pem -key PushNotificationStarterKey.pem Enter pass phrase for PushNotificationStarterKey.pem: ... --- abcd <- 何か入力してみた closed # 何か入力したら切断される(それでOK) |
無事に接続確認完了!
実装
ようやく実装しますよ!!!まずは ngCordova を取得しましょう。( bowerのことは知っているものとして説明はしません!)
|
1 2 3 |
# ngCordovaのインストール bower install ngCordova --save |
取得できた ngCordovaを script タグに追加します。
|
1 2 3 4 |
<!-- cordova script (this will be a 404 during development) --> <script src="lib/ngCordova/dist/ng-cordova.js"></script> <script src="cordova.js"></script> |
そして、 angular.module の依存モジュールに ngCordova を追加します。
|
1 2 3 |
// app.js angular.module('starter', ['ionic', 'ngCordova', 'starter.controllers', 'starter.services']) |
今回のサンプルに必要な cordova のプラグインを一通りインストールします。特に重要なのが PushPlugin です!
|
1 2 3 4 5 6 7 8 9 |
# 必要なcordovaのpluginを追加 ionic plugin add org.apache.cordova.console ionic plugin add org.apache.cordova.device ionic plugin add org.apache.cordova.dialogs ionic plugin add org.apache.cordova.file ionic plugin add org.apache.cordova.media ionic plugin add https://github.com/phonegap-build/PushPlugin ionic plugin add https://github.com/EddyVerbruggen/Toast-PhoneGap-Plugin.git |
controllers.js は GitHub の PushNotificationSample からほぼ丸パクリで作ります!
↓の中身にはほとんど触れません。(プッシュ通知のAPIは cordova のドキュメントを見ればわかるはずなので)
|
1 2 3 4 5 6 7 8 9 10 11 12 13 14 15 16 17 18 19 20 21 22 23 24 25 26 27 28 29 30 31 32 33 34 35 36 37 38 39 40 41 42 43 44 45 46 47 48 49 50 51 52 53 54 55 56 57 58 59 60 61 62 63 64 65 66 67 68 69 70 71 72 73 74 75 76 77 78 79 80 81 82 83 84 85 86 87 88 89 90 91 92 93 94 95 96 97 98 99 100 101 102 103 104 105 106 107 108 109 110 111 112 113 114 115 116 117 118 119 120 121 122 123 124 125 126 127 128 129 130 131 132 133 134 135 136 137 138 139 140 141 142 143 144 145 146 147 148 149 150 151 152 153 154 155 156 157 158 159 160 161 162 163 164 165 166 167 168 169 170 171 172 173 174 175 176 177 178 179 180 181 182 183 184 185 186 187 188 189 190 191 192 193 194 195 196 |
// controllers.js修正 angular.module('starter.controllers', []) .controller('DashCtrl', function($scope) {}) .controller('ChatsCtrl', function($scope, Chats) { // With the new view caching in Ionic, Controllers are only called // when they are recreated or on app start, instead of every page change. // To listen for when this page is active (for example, to refresh data), // listen for the $ionicView.enter event: // //$scope.$on('$ionicView.enter', function(e) { //}); $scope.chats = Chats.all(); $scope.remove = function(chat) { Chats.remove(chat); }; }) .controller('ChatDetailCtrl', function($scope, $stateParams, Chats) { $scope.chat = Chats.get($stateParams.chatId); }) .controller('AccountCtrl', function($scope) { $scope.settings = { enableFriends: true }; }) .controller('AppCtrl', function($scope, $cordovaPush, $cordovaDialogs, $cordovaMedia, $cordovaToast, ionPlatform, $http) { $scope.notifications = []; // call to register automatically upon device ready ionPlatform.ready.then(function (device) { $scope.register(); }); // Register $scope.register = function () { var config = null; if (ionic.Platform.isAndroid()) { config = { "senderID": "YOUR_GCM_PROJECT_ID" // REPLACE THIS WITH YOURS FROM GCM CONSOLE - also in the project URL like: https://console.developers.google.com/project/434205989073 }; } else if (ionic.Platform.isIOS()) { config = { "badge": "true", "sound": "true", "alert": "true" } } $cordovaPush.register(config).then(function (result) { console.log("Register success " + result); $cordovaToast.showShortCenter('Registered for push notifications'); $scope.registerDisabled=true; // ** NOTE: Android regid result comes back in the pushNotificationReceived, only iOS returned here if (ionic.Platform.isIOS()) { $scope.regId = result; storeDeviceToken("ios"); } }, function (err) { console.log("Register error " + err) }); } // Notification Received $scope.$on('$cordovaPush:notificationReceived', function (event, notification) { console.log(JSON.stringify([notification])); if (ionic.Platform.isAndroid()) { handleAndroid(notification); } else if (ionic.Platform.isIOS()) { handleIOS(notification); $scope.$apply(function () { $scope.notifications.push(JSON.stringify(notification.alert)); }) } }); // Android Notification Received Handler function handleAndroid(notification) { // ** NOTE: ** You could add code for when app is in foreground or not, or coming from coldstart here too // via the console fields as shown. console.log("In foreground " + notification.foreground + " Coldstart " + notification.coldstart); if (notification.event == "registered") { $scope.regId = notification.regid; storeDeviceToken("android"); } else if (notification.event == "message") { $cordovaDialogs.alert(notification.message, "Push Notification Received"); $scope.$apply(function () { $scope.notifications.push(JSON.stringify(notification.message)); }) } else if (notification.event == "error") $cordovaDialogs.alert(notification.msg, "Push notification error event"); else $cordovaDialogs.alert(notification.event, "Push notification handler - Unprocessed Event"); } // IOS Notification Received Handler function handleIOS(notification) { // The app was already open but we'll still show the alert and sound the tone received this way. If you didn't check // for foreground here it would make a sound twice, once when received in background and upon opening it from clicking // the notification when this code runs (weird). if (notification.foreground == "1") { // Play custom audio if a sound specified. if (notification.sound) { var mediaSrc = $cordovaMedia.newMedia(notification.sound); mediaSrc.promise.then($cordovaMedia.play(mediaSrc.media)); } if (notification.body && notification.messageFrom) { $cordovaDialogs.alert(notification.body, notification.messageFrom); } else $cordovaDialogs.alert(notification.alert, "Push Notification Received"); if (notification.badge) { $cordovaPush.setBadgeNumber(notification.badge).then(function (result) { console.log("Set badge success " + result) }, function (err) { console.log("Set badge error " + err) }); } } // Otherwise it was received in the background and reopened from the push notification. Badge is automatically cleared // in this case. You probably wouldn't be displaying anything at this point, this is here to show that you can process // the data in this situation. else { if (notification.body && notification.messageFrom) { $cordovaDialogs.alert(notification.body, "(RECEIVED WHEN APP IN BACKGROUND) " + notification.messageFrom); } else $cordovaDialogs.alert(notification.alert, "(RECEIVED WHEN APP IN BACKGROUND) Push Notification Received"); } } // Stores the device token in a db using node-pushserver (running locally in this case) // // type: Platform type (ios, android etc) function storeDeviceToken(type) { // // Create a random userid to store with it // var user = { user: 'user' + Math.floor((Math.random() * 10000000) + 1), type: type, token: $scope.regId }; // console.log("Post token for registered device with data " + JSON.stringify(user)); // $http.post('http://192.168.1.16:8000/subscribe', JSON.stringify(user)) // .success(function (data, status) { // console.log("Token stored, device is successfully subscribed to receive push notifications."); // }) // .error(function (data, status) { // console.log("Error storing device token." + data + " " + status) // } // ); } // Removes the device token from the db via node-pushserver API unsubscribe (running locally in this case). // If you registered the same device with different userids, *ALL* will be removed. (It's recommended to register each // time the app opens which this currently does. However in many cases you will always receive the same device token as // previously so multiple userids will be created with the same token unless you add code to check). function removeDeviceToken() { // var tkn = {"token": $scope.regId}; // $http.post('http://192.168.1.16:8000/unsubscribe', JSON.stringify(tkn)) // .success(function (data, status) { // console.log("Token removed, device is successfully unsubscribed and will not receive push notifications."); // }) // .error(function (data, status) { // console.log("Error removing device token." + data + " " + status) // } // ); } // Unregister - Unregister your device token from APNS or GCM // Not recommended: See http://developer.android.com/google/gcm/adv.html#unreg-why // and https://developer.apple.com/library/ios/documentation/UIKit/Reference/UIApplication_Class/index.html#//apple_ref/occ/instm/UIApplication/unregisterForRemoteNotifications // // ** Instead, just remove the device token from your db and stop sending notifications ** $scope.unregister = function () { // console.log("Unregister called"); // removeDeviceToken(); // $scope.registerDisabled=false; //need to define options here, not sure what that needs to be but this is not recommended anyway // $cordovaPush.unregister(options).then(function(result) { // console.log("Unregister success " + result);// // }, function(err) { // console.log("Unregister error " + err) // }); } }) ; |
services.js も同じく!
|
1 2 3 4 5 6 7 8 9 10 11 12 13 14 15 16 17 18 19 20 21 22 23 24 25 26 27 28 29 30 31 32 33 34 35 36 37 38 39 40 41 42 43 44 45 46 47 48 49 50 51 52 53 54 55 56 57 58 59 60 61 62 63 64 65 |
// services.js 追加 angular.module('starter.services', []) .factory('Chats', function() { // Might use a resource here that returns a JSON array // Some fake testing data var chats = [{ id: 0, name: 'Ben Sparrow', lastText: 'You on your way?', face: 'img/ben.png' }, { id: 1, name: 'Max Lynx', lastText: 'Hey, it\'s me', face: 'img/max.png' }, { id: 2, name: 'Adam Bradleyson', lastText: 'I should buy a boat', face: 'img/adam.jpg' }, { id: 3, name: 'Perry Governor', lastText: 'Look at my mukluks!', face: 'img/perry.png' }, { id: 4, name: 'Mike Harrington', lastText: 'This is wicked good ice cream.', face: 'img/mike.png' }]; return { all: function() { return chats; }, remove: function(chat) { chats.splice(chats.indexOf(chat), 1); }, get: function(chatId) { for (var i = 0; i < chats.length; i++) { if (chats[i].id === parseInt(chatId)) { return chats[i]; } } return null; } }; }) .factory(("ionPlatform"), function( $q ){ var ready = $q.defer(); ionic.Platform.ready(function( device ){ ready.resolve( device ); }); return { ready: ready.promise } }) ; |
あとは、 index.html に AppCtrl を追加しておきましょう。
|
1 2 3 4 5 6 7 8 9 10 11 12 13 14 15 16 17 18 19 |
<body ng-app="starter"> <!-- The nav bar that will be updated as we navigate between views. --> <div ng-controller="AppCtrl"> <!-- ←AppCtrl追加 --> <ion-nav-bar class="bar-stable"> <ion-nav-back-button> </ion-nav-back-button> </ion-nav-bar> </div> <!-- The views will be rendered in the <ion-nav-view> directive below Templates are in the /templates folder (but you could also have templates inline in this html file if you'd like). --> <ion-nav-view></ion-nav-view> </body> |
さらに config.xml の widget id に上の手順で作成した Bundle ID を設定します。
|
1 2 3 4 5 6 7 8 9 10 11 12 13 14 15 16 17 18 19 20 21 |
<?xml version="1.0" encoding="UTF-8" standalone="yes"?> <widget id="com.bundle.pushnotificationstarter" version="0.0.1" xmlns="http://www.w3.org/ns/widgets" xmlns:cdv="http://cordova.apache.org/ns/1.0"> <name>push-notification-starter</name> <description> An Ionic Framework and Cordova project. </description> <author email="you@example.com" href="http://example.com.com/"> Your Name Here </author> <content src="index.html"/> <access origin="*"/> <preference name="webviewbounce" value="false"/> <preference name="UIWebViewBounce" value="false"/> <preference name="DisallowOverscroll" value="true"/> <preference name="android-minSdkVersion" value="16"/> <preference name="BackupWebStorage" value="none"/> <feature name="StatusBar"> <param name="ios-package" value="CDVStatusBar" onload="true"/> </feature> </widget> |
さてさて、クライマックスです!XCodeのプロジェクトを作って、実機にインストール!
|
1 2 3 4 5 6 |
# XCodeプロジェクトの準備 ionic prepare ios && ionic build ios # 実機でテスト! ionic run ios --device |
デバイストークン取得
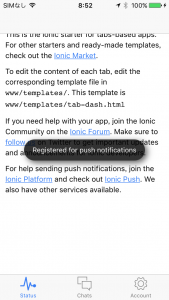
↑のコードに従っていれば、起動と同時にデバイストークンを console に出力しているので、それをチェックしましょう。
Safariの開発者ツールで実機に接続します。

デバイストークンが表示されていなかったら ⌘R でリロードしましょう!↓のようにデバイストークンが表示されるはずです。

push通知テスト
SimplePush という簡単なプッシュ通知をAPNSに送れるサンプルプログラムがあるので、ダウンロードします。
上の手順で作った ck.pem ファイルを↓の場所に入れておきましょう!

あとは、先ほど手に入れたデバイストークンと、秘密鍵保護用のパスワードを入力して、サンプルプログラムは完成。

それでは、テストでプッシュ通知を送信してみましょう!(要ローカルで php インストール)
|
1 2 3 4 |
php simplepush.php Connected to APNS Message successfully delivered |
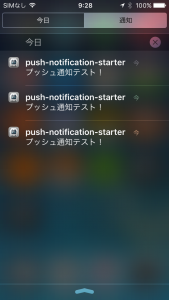
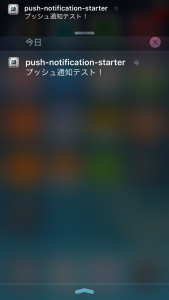
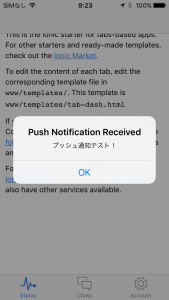
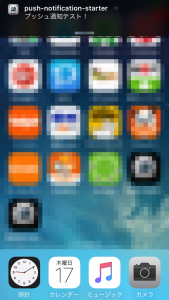
↑のメッセージが出ていれば APNS への送信成功です。実機で↓のように確認できていれば、証明書周りの手続きは全部正常に行えていることになります!あとは、どうやって実装するか、ようやくそこだけ考えれるようになります。
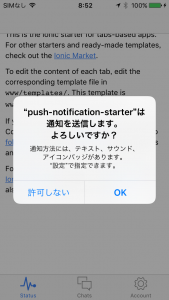
おつかれさまでした!


